


How to Master Your Pedal Stroke
- By Benjamin Sharp
- Published: 10 nov 2022
- Last Updated: 10 nov 2022

Cycling, whether indoors on a smart trainer or outdoors is a technical sport. Its complexity is masked by its simplicity. There is a reason that “just like riding a bike” is universally used as a phrase to describe something that can easily be done, even after a long hiatus. Nevertheless, it’s tempting to be overwhelmed by the minutiae and hidden complexity of pressing on pedals to make your bike go faster.
Importance of Bike Fit in Pedal Stroke
Before trying to address what might be the “correct” way to pedal, it is important to know that actually executing an efficient pedal stroke will be nearly impossible without a proper bike fit. At the risk of plunging deep into the rabbit hole of fitting bikes, I will note below a couple suggestions that should serve as a reasonable starting point. I will provide some notes on saddle height, saddle fore/aft, and cleat positioning. This is no way intended to be a comprehensive post about bike fitting. Bike fitting should be left to the experts.
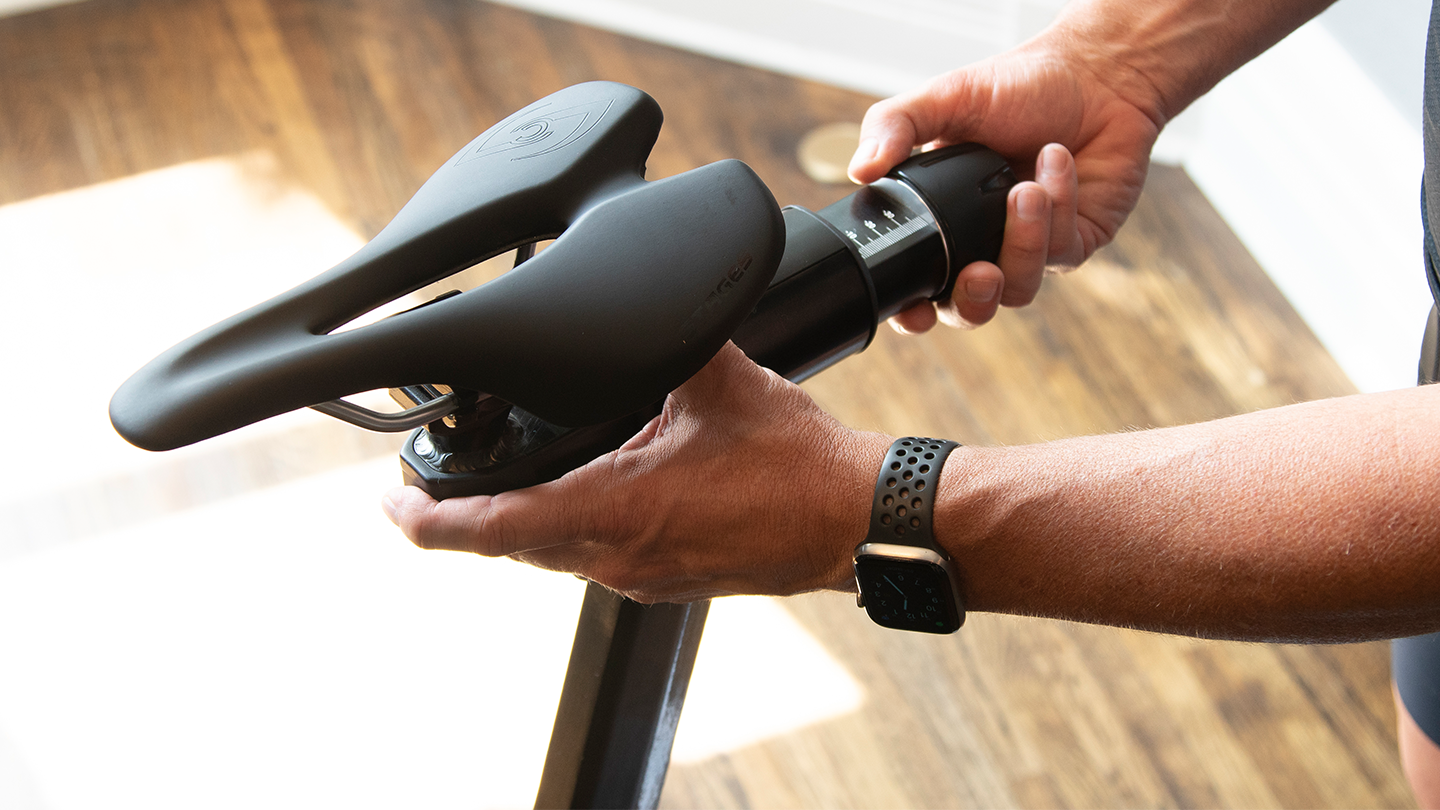
Seat Height
Many newer cyclists make the mistake of having their seat height set too low. While a lower saddle height might be perceived as safer, to protect connective tissue and joints, it is sub-optimal when it comes to efficiency and the ability to fully utilize the most powerful and most important muscles of the leg. On an indoor bike, or on your outdoor bike while being held or leaning against a wall, while in the natural seated position, unclip your cycling shoe and rest your heel on the center of the pedal. When the crank and pedal are in the bottom or 6 o’clock position, your leg should be straight, with no bend in the knee. If you can’t reach the pedal in this position, lower your saddle until the heel of your shoe can rest on the pedal. If your knee is bent, then raise your saddle to achieve the desired straight knee.
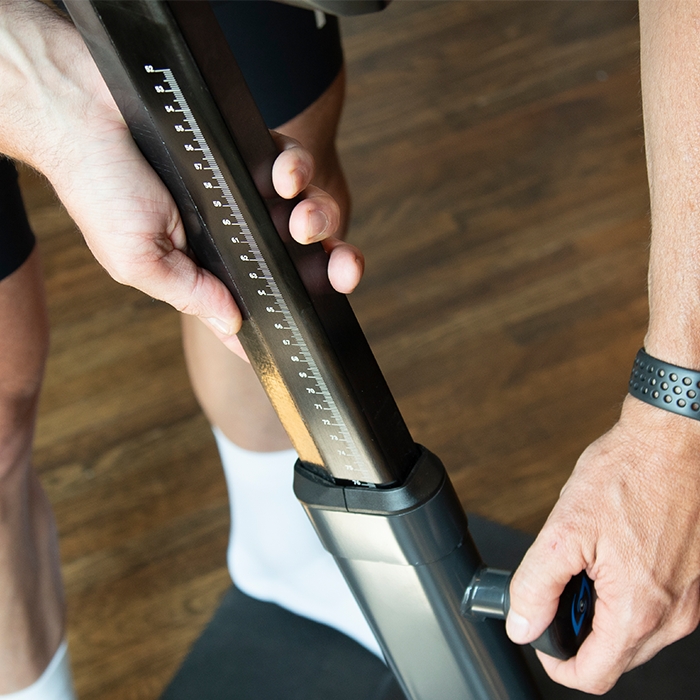
Saddle Fore/Aft
The next important saddle setting is called the fore/aft or saddle setback. When looking at a bike from the side, this is the position of the saddle on the horizontal plane, relative to the center of the bottom bracket, around which the cranks rotate. The setback indicates where your hips and knee are relative to the position of your foot. Too far back and you won't be able to produce as much power, too far forward and you risk soft tissue injury in your knee. Setting this part of the saddle is slightly more involved. Ideally, you have a helper that can help you make the measurement while seated on the bike. The position you are striving for is called KOPS (Knee Over Pedal Spindle). KOPS is intended to be a starting point and after determining KOPS, riders should feel empowered to make incremental adjustments to the fore/aft of the saddle to find the optimal position.
To determine your saddle setback, while clipped in or with your foot in your natural pedaling position, and seated in your normal position, on a static bike, with the right crank in the 3 o’clock position (parallel to the ground and forward, place a yardstick so that it is vertical and resting against your right knee. With the yardstick perfectly vertical, it should pass from the front of your knee to touching and just in front of the pedal spindle. If the yardstick is behind the pedal spindle, consider moving your seat forward. If the yardstick passes in front of the pedal spindle without touching it, the recommendation would be to move your saddle back.
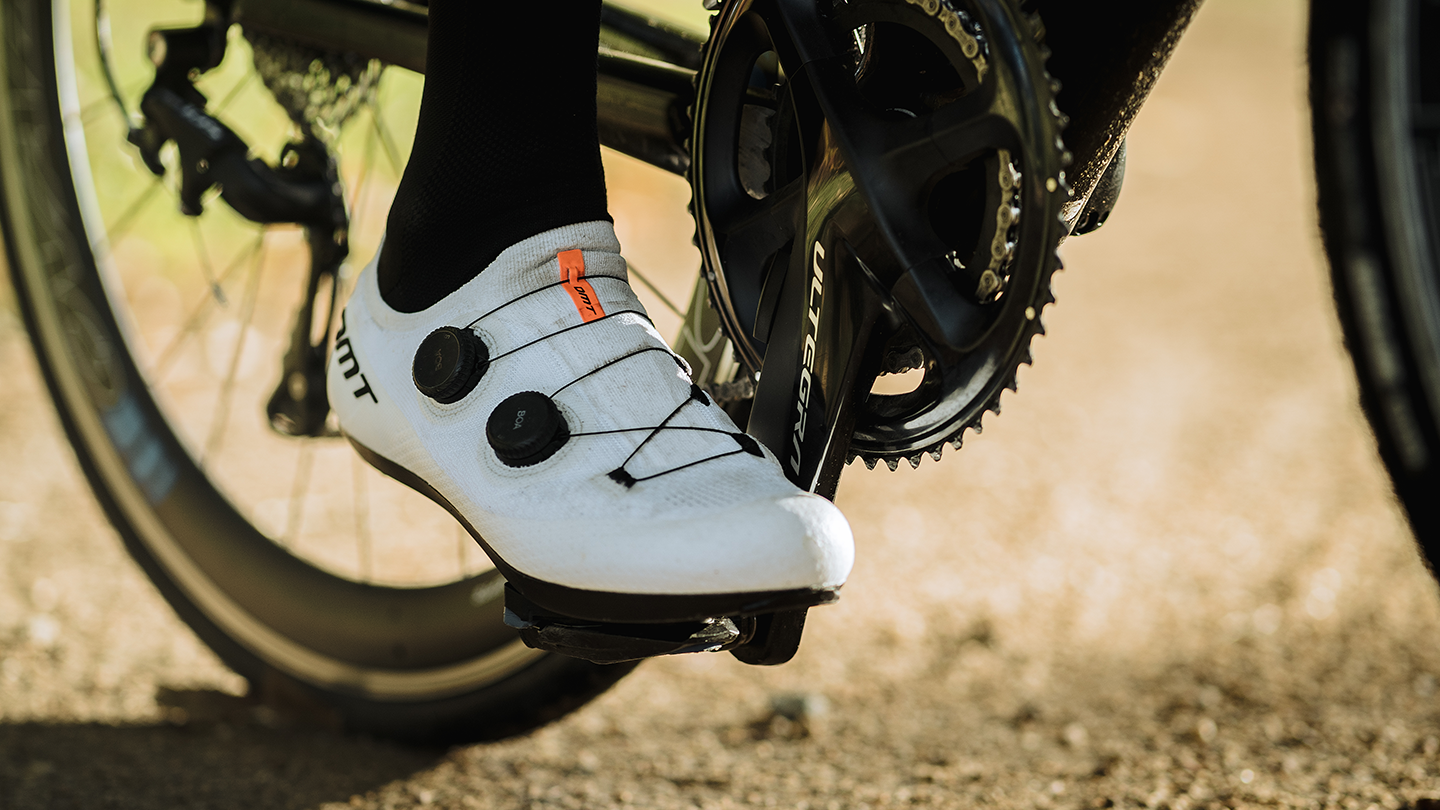
Cleat Position
Finally, cleat position should be considered. If you are not using a pedal system that allows your shoe to attach to the pedal with a spring-loaded mechanism, you won’t need to worry about this portion of the setup. If you are using “clipless” pedals a bit of attention should be spent toward proper cleat setup. The most neutral location for cleats is to position them so that the ball of the foot is lined up with the center of the pedal. Moving your cleat in front of the ball of your foot might create more movement in the ankle while pedaling which could create issues with the Achilles tendon. A cleat position further back might make hard/fast accelerations more difficult but it could also relieve toe numbness and pain in the forefoot or “hot feet”. In addition to being adjustable front to back, cleats are adjustable from side to side. As a starting point, cleats should be setup to allow for as narrow a stance on the pedals as possible, while facilitating clearance between your ankle and the crankarm.
Now that you are confident that you have a solid basic position on the bike, let’s get into how to pedal with perfect precision and power output. NOPE! Not happening. The perfect pedal stroke is a myth. An electric motor can apply torque equally through 360 degrees of rotation however, the biomechanical and structural design of our legs prevents us from applying torque throughout the entire pedal stroke. Further, the muscles responsible for pressing on the pedals are much stronger than the muscles that facilitate pulling up on the back side of the pedal stroke.
Pedaling Style
Every rider has their own pedaling style. We individually possess a unique solution to the problem of making our bike go fast by pedaling. Even starting with a basic and safe position on the bike, there is still ample opportunity to move your legs in a unique fashion. Some riders will drop their heels slightly at the bottom of their pedal stroke, others might pedal toe-down through the same phase of the pedal stroke. Some athletes lift their heels through the back phase of the pedal stroke. And that’s okay! Trying to mimic someone else’s pedal stroke or idea of the perfect pedal stroke is not advised. There are some caveats of course. For example, despite how you may see professional cyclists or triathletes pedaling, trying to limit unnecessary side-to-side or lateral movement will go a long way toward having happier and healthier hips, knees, and ankles.
Avoiding Pedal Dead Spots
As a lurker in the Facebook Stages SB20 Owners Group, I have seen a few people ask about a “clunk” they hear/feel in the pedals, in time with their pedaling cadence. They report experiencing the clunk at the same point of their pedal stroke each pedal revolution. The concern is that something is mechanically amiss with their bike. The truth is, the clunk is actually a result of not being able to keep up with the pedals throughout the pedal stroke. In fact, the drivetrain belt is going slack at the dead spot (the top and the bottom of the stroke) of the pedal stroke and the clunk happens when the rider’s foot catches up to the drivetrain.
Cyclists may also find a similar clunk in their pedal stroke when their pedal cadence goes above a certain threshold. The fast cadence drills workout below is an example of an exercise that can be performed to facilitate a faster transition from “push” to “pull” and make for a more effective overall pedal stroke.
Another situation where one may experience this “clunk” is with single-leg pedaling. It’s quite humbling to ride with one leg unclipped and hanging off to the side (out of the way of the rotating pedal and crankarm). Even veteran cyclists that attempt one-legged-drills as part of their regular cycling practice may find that they have the dreaded clunk at the top of their pedal stroke. This phenomenon rears its head because when pedaling with one leg, there is no leg/foot attached to the opposing crank/pedal to weight the opposite side and slow down the pedal stroke through the transitions. Give this a try for yourself with the one-legged-drills workout below. Disregard power numbers while doing this, as they will be inaccurate during single-leg drills.
Optimal Cycling Cadence
Depending on physiology and practice, an optimal pedal cadence is unique to each individual. This might be where the phrase “different strokes for different folks” comes from though I seriously doubt it. Most people’s comfort zone likely exists in a range between 80-100 rpm, though there can definitely be outliers. At the same power output, a lower pedal cadence will rely more on muscular force while at a higher pedal cadence, athletes will depend more on the cardiovascular system. It is generally not recommended to ride a cadence below 60 RPM and most athletes outside of the uber experienced and particularly well-trained will not be able to efficiently or effectively ride at an RPM greater than 120 for an extended period of time. One reason to promote a higher pedal cadence is to facilitate quick changes in power. The next time you’re riding, note how quickly you can increase speed, without changing resistance, from 90 rpm vs. starting from 60 rpm. Lifting pace from 60 rpm requires a massive increase of applied force and pedal speed while increasing power from 90 rpm can be achieved more easily.
There can be an advantage to utilizing a lower cadence in training though there are some mixed opinions on the benefit of low cadence training for strength gains. However, a strong argument can be made for the benefit of riding at low rpms to smooth out problematic pedal strokes, particularly for riders that are suffering from the aforementioned dreaded clunk. See the Over Gear workout below as an example of an exercise that can be performed to slow down the pedal and foot speed to allow for deliberate practice in shortening the transition through the dead spots of a pedal stroke.
Please note that these exercises are NOT recommended for riders with knee pain. If you experience knee pain while doing this workout, drop the resistance/gear and soft pedal in an easy gear. If you revisit this workout in the future, attempt it at a slightly higher rpm.
Left Right Power Balance
Some athletes using Stages Dual Sided Power meters may notice an imbalance between their left and right power contribution. When looking at a file post-workout or if they have left/right balance displayed on their head unit, they may notice that the workload is not perfectly balanced at 50:50. This observation is not uncommon. Even in the healthy population, most people have a favored leg; whether kicking a soccer ball or pedaling a bicycle, each of us tends to have a stronger leg. To see that balance off by a couple percent is not uncommon. It’s also not common to observe that when approaching threshold intensity (Zone 4 Power), the LR balance gets closer to 50:50.
If you are trying to determine if you have a detrimental leg imbalance, it’s important to make those observations at different intensities to see if the leg that is utilized less at lower intensities “steps up” and is recruited more effectively at higher intensities. Regardless, I have observed very successful elite athletes perform at a high level with a pretty wide imbalance E.g., 55:45 or more. I’ve also seen very successful elite athletes attempt to address an imbalance with specific drills and strength training only to injure their “weaker” leg with the extra workload. Outside of trauma or other extenuating circumstances, it’s pretty safe to say that most of us have a preferred or stronger/more efficient leg and that’s okay.
Our goal isn’t necessarily to ride with symmetry but to produce the most power possible. For some of us, that might be with one leg being more responsible for that workload than the other. If you find that you have acute pain or an injury that is preventing you from achieving close to balanced pedaling, schedule an assessment with an experienced bike fitter and/or a physical therapist.
At the end of the day, your pedal style is as unique as you are. I would not recommend trying to mimic what you see others doing. With a safe and proper bike fit, you should be able to pedal efficiently. However, some of the drills below may assist in adding some efficiency to your power.

Pedal Technique Drills
Fast Cadence Drills
Fast Cadence workouts will improve pedaling mechanics through high rpms or cadence. These exercises will help develop your pedal stroke to make it smoother and more efficient. For Fast Cadence exercises, the gearing should be light with low resistance or low wattage. You should focus on good pedaling technique as well as keeping your hips from bouncing or rocking. Concentrate on the transitions, pulling through the bottom of the pedal stroke, “bottom dead center,” and pushing over the “top dead center.”
Your heart rate will be elevated while performing Fast Cadence exercises due to the high rpms, but do not use it to determine the intensity of the interval. If you’re using power as your gauge, you should do these workouts at Recovery to Endurance output (zone 1-2) though your heart rate may climb as high as the Threshold Zone on occasion. During an easy ride or as part of a warmup for a longer/harder workout, perform two Fast Cadence efforts for three minutes each with five minutes of continued easier riding between the efforts. Aim for a cadence of 110 rpm or more provided you are able to smoothly pedal the bike. If you find yourself bouncing or clunking through the pedal stroke, reduce your cadence until you achieve a smoother stroke. The progression is to increase the number of repetitions and the sustainable rpm. See the Over Gear workout below for another progression suggestion.
One-Legged Drills
During an easy ride or as part of a warmup for a longer or harder workout, pedal with one leg at a time in a light gear for intervals of pre-determined time. Switching from leg to leg; aiming to maintain at least 80 RPM. If you are unable to maintain 80 rpm, shift into a lighter gear. This is best done on an indoor trainer or flat road. While performing One-Legged Pedaling, try to visualize scraping mud or gum off the bottom of your shoes by pulling your toes through the bottom of the pedal stroke. At the top of the pedal stroke, begin to push your pedals (or toes) forward just before they reach top dead center. It’s important to incorporate your quad muscles, hip flexors, calf, and hamstring muscles for an efficient pedal stroke. By incorporating more muscles into one’s pedal stoke, an athlete is spreading out the workload to more muscles and smoothing out the “dead” spots which reduces muscle fatigue and helps increase endurance, strength and power.
Start with six repetitions (for each leg) of 30 seconds, alternating between your left and right leg with no rest between switching legs. Focus on maintaining a solid posture on the bike and a quiet and still upper body. Progression is to increase the RPM, duration of each repetition, number of repetitions, and performing the one-legged pedaling drills with hands in the handlebar drops (road handlebars) or in the handlebar extensions (time trial or triathlon handlebars). Note that if you are using a single-side power meter, you may not see power reported when attached to the non-power-equipped pedal or crankarm and will see a doubled power value when pedaling with the power-equipped pedal or crankarm. Don’t concern yourself with your power during this exercise. This workout is strictly intended to be pedaling skills practice.
Over Gear Pedaling
Deliberate Over Gear Pedaling slows down your pedal speed while still under load and helps train your pedaling form. With very high resistance, pedal at a steady cadence of about 60 RPM. Maintain a solid and quiet posture on the bike, allowing all of the power to come from your legs. Keep a light grip on the handlebars. Power should be in Zone 3 or Zone 4 and heart rate may be in the same area. If you find your heart rate creeping to above Zone 4, reduce resistance. During an otherwise easier ride, add two five-minute Over Gear intervals with five minutes of easy pedaling (Zone 1 Power and Heart Rate) between the Over Gear bouts. Progression is to add duration to the intervals or the number of repetitions. Advanced riders might add a Fast Cadence interval of the same duration immediately after the Over Gear interval (with no rest between). For example, an Over Gear / Fast Cadence workout could be two repetitions of five minutes of Over Gear followed immediately by five minutes of Fast Cadence with five minutes of easy recovery riding between the intervals.
Accels
Anyone that has been coached by me knows this as a staple exercise. Accels can be performed during a recovery (Zone 1 Power/Heart Rate) or Endurance (Zone 2 Power/Heart Rate) ride. There isn’t a set recovery period between accels as proper execution is dependent on terrain (when outdoors). To perform an accel, stay seated and on a downhill or with a tailwind, sprint in a light gear, aiming for 120-130 RPM for 10 seconds. Accels are initiated from a rolling start between 10-15 mph. Focus on keeping your upper body still and a smooth pedal stroke, particularly paying attention to the transition between from pulling to pushing at the top of the pedal stroke and pushing to pulling at the bottom of the pedal stroke. Pepper 4 accels into your training ride a couple times per week.


