


Why Train With Power?
- By Amber Jaworsky
- May 27, 2022

We all want to know if our workouts are effective, and it’s motivating to track our fitness and progress. But, perceived exertion, revolutions per minute (RPMs), beats per minute (BPMs), and caloric burn only tell us half of the story. The rest, and the most accurate part of the story, is communicated through a power meter. A power meter is a tool that precisely captures and quantifies the amount of work that’s put into a ride. It does this by measuring the amount of power a cyclist produces on a ride. This measurement is expressed in watts and it’s a highly accurate and stable measurement. What you put in, is what you get out.
For years, heart rate training has been a gold standard in training, but heart rate monitors only capture your body’s response to the workload. They don’t quantify the actual amount of work you are doing. Power meters, on the other hand, measure your output, how much power you are producing, and it’s an unwavering measurement.
Heart rate can vary day-to-day. Temperature, hydration level, fatigue, stress, caffeine, and other factors can easily influence your heart rate, which makes it difficult to quantify the intensity of your efforts. Power, on the other hand, does not fluctuate from day-to-day. A watt is always a watt, regardless of how you feel, how hot, cold, windy, or hilly it is. When you have an accurate measurement of what you are putting into a ride, your training will be exponentially more effective.
Power Meters Aren't Just for the Pros
Common Power-Based Training Terms
Power Meters on Stationary Bikes
Power Meters Aren't Just for the Pros
Whether you’re training to win a world championship, training for your first race, or just riding for fun, a power meter can be the single best tool to increase your fitness and cycling performance. As mentioned above, a power meter allows you to precisely calculate your effort, so it leads to better training outcomes and improved fitness levels for anyone who uses it. Adding a power meter to your training strategy takes the guesswork out of training and helps you to know how hard you should be riding, if your fitness is improving, or if you had a truly productive ride.
In order to start riding with power, a test to determine your functional threshold power (FTP) is necessary. FTP is an estimation of the amount of work you can do for one hour in an all-out, race-like ride. Once you know this number, all your power training zones can be established. (Learn more about finding your FTP here.)
How Does a Power Meter Work?
Power output is measured as a calculation of torque (how hard you’re pushing the pedals) multiplied by cadence (how fast the pedals are turning – or revolutions per minute).
POWER = TORQUE x CADENCE
P = 2X[(F x 9.8 x L) x (R x .1047)]
P = Power, aka Watts.
To measure torque, Stages’ proprietary strain gauges are laid precisely along the crank arm. These gauges, which are the same tool used in aerospace, can detect the smallest flex in the stiffest crank. In this case, every pedal stroke causes a small amount of flex along the crank arm. This downward force happens in every rotation. This force, multiplied by 9.8m/s2 and the length of the crank arm are used to determine the force applied to a pedal stroke, or torque.
The Stages Power meter uses an accelerometer (the same technology used to tell your phone how to orient its screen), to measure cadence. The proprietary circuitry houses this cadence tool, allowing the meter to eliminate the antiquated need of magnets, external sensors, cables and zip ties to measure cadence. This modern technology also allows the meter to capture multiple positions per revolution, resulting in a faster response and better overall data. Once cadence and torque are collected, they are multiplied together to determine the POWER of a single pedal stroke.
Power is useless unless a rider can see their power data, so most riders will view their power on a head unit mounted to their bike. Older power meters required a wire to transmit data to a head unit but all new power meters transmit data wirelessly through ANT+ and/or Bluetooth.
Power Meters for Cyclists
Pros and recreational cyclists everywhere are discovering that power is fundamental to cycling performance, and Stages Cycling has a power meter for every rider! Unlike other sports, cycling is unique in that the work put in on a bike can be unerringly measured and quantified. This type of information is not only fun to collect and analyze, but it can be very helpful, even if you’re not a professional cyclist.
A power meter can help cyclists:
- pace themselves on long rides
- keep a steady effort regardless of conditions like temperature, wind or terrain
- measure the physical stress and level of fatigue of workouts
- add structure to a training program through power-based training zones
- maximize training time by improving the quality of training sessions
- track fitness gains more accurately
- enjoy the instant gratification of real-time data
If you’re chasing peak performance or would like to become more familiar with some of the key terms and metrics that training with power can provide, check out the table below.
Common Power-Based Training Terms
| FTP- Functional Threshold Power |
Estimates the maximum average power you can hold for one hour |
| Average Power |
The overall average power sustained over a given period |
| NP- Normalized Power |
A mathematically weighted version of average power, that estimates the power that could have been produced over a time period had it been ridden steadily without coasting or surges |
| VI- Variability Index |
A ratio of normalized power to average power, VI measures how close you keep your power to average power |
| IF- Intensity Factor |
Measures how intense a ride is |
| Watts per Kilo | A basic power-to-weight ratio measurement. This data point reflects how many watts you can hold for a certain period of time, divided by your weight in kilograms - and can help you to compare your fitness level with others. |
| TSS- Training Stress Score | Quantifies the physical stress of a workout |
| CTL- Chronic Training Load | Measures fitness, the cumulative effect of training over time |
| ATL- Acute Training Load | Measures fatigue, the short-term effect of recent workouts |
| TSB- Training Stress Balance | Describes “freshness” by weighing fitness vs. fatigue, also knowns as Form |
Power Meters for Triathletes
Power meters are a triathlete’s best friend! Triathletes who train with power are able to:
- train smarter and manage TSS, CTL & ATL
- maximize race performance by pacing on the bike to boost performance on the run
- evaluate race performance
- optimize the time spent in training
Broad FTP % and distance recommendations include:
Sprint Distance Triathlon: Target 95-100% of FTP
Olympic Distance Triathlon: Target 85-95% FTP
½ Iron Distance Triathlon: Target 75-85% FTP
Full Ironman Distance Triathlon: 65-75% FTP
Power Meters for Stationary Bikes
Weather, availability of daylight in winter months and other convenience factors can prohibit outdoor training and cycling. But, indoor bikes and indoor bike training can help triathletes and cyclists alike maintain and build their fitness in significant ways.
Here’s how you’ll benefit:
- Convenient & Saves Time. Getting ready for a ride outdoors requires some prep time. When you’re indoors, you can just hop on and ride. No drive time, bike prep, clean up, traffic or environmental factors.
- Maximizes Training Time. When you ride indoors, you’re constantly working. If you ride for 60 minutes indoors, you pedal for 60 minutes. Traffic lights, terrain, other riders or cars can influence your actual ride time outside (on average, a 60 minute indoor ride would equal 90 minutes of riding outside). Riding indoors ensures consistent effort and consistent conditions, which makes your training more efficient.
- Precise Training. Indoor rides enable you to structure your workouts however you’d like, and when you’re training with your power meter inside, you can construct perfect intervals. A 5 minute interval is a tried and true 5 minute interval- without the interruptions of hills, shifting, traffic lights or turns. There are also a ton of advanced workout options available on today's most popular indoor cycling apps (Zwift, Peloton, Rouvy etc.) that you can tap into.
- Repeatability. Repeating and comparing workout data is a great way to determine fitness gains. Indoor workouts are quite conducive to side by side comparison, but direct comparisons on outdoor workouts can be more difficult to replicate due to environmental variables.
Power Meter Types
Power meters can be located almost anywhere on the drivetrain of a bike. The three most common options include: crank arm, pedal and spider-based power meters. Each has their own advantages and drawbacks.
Crank Arm-Based Power Meters
A crank arm-based power meter measures the forces in the crank arm of a bike. This type of power meter is popular because they’re more reasonably priced, and are easy to install. Most crank arm power meters are single-sided (either on the left or right side of your bike) and measure power just on the one side and then double the data to give power numbers that are inline with spider or pedal-based systems. There have been 5 Tour de France wins with Stages left sided power meters. Right sided power meters are great for tight clearance gravel, mountain and aero bikes.
If you’re a data junky, or a cyclist that’s interested in measuring power from each leg independently, a dual sided power meter might be a good fit for you. Dual sided means you have power meters on both the left and right sides of your bike. With a dual sided power meter, you’ll be able to view advanced data such as your true left/right balance, torque efficiency and pedaling smoothness.
Power Meter Pedals
With power meter pedals, each pedal is equipped with its own power meter, allowing independent measurements of the right and left leg. Pedal-based power meters are easy to install and remove and provide a ton of data, but they can restrict the choice of pedal and cleat system. There is also a greater chance of damage due to pedal strikes and crashes.
Spider-Based Power Meters
Spider-based power meters were the first type of power meter ever made, and they are known for their accuracy because they approximate left-right pedaling balance. Spider power meters are sold as part of a complete crankset or as a standalone spider to fit into a compatible crankset, so transferring a spider-based power meter between bikes can be very challenging, especially due to crank or bottom bracket compatibility.
How to Install a Power Meter
Crank-Based Power Meters
To install a crank-based power meter to your bike, you will essentially be replacing one of your existing crank arms with a crank-based power meter. The Stages Gen 3 power meter comes in a small box with a few easy-to-follow instructions, but if you'd rather watch a step-by-step video of the process, click here.
Power Meter Pedals
To install pedal-based power meters, simply remove your existing pedals and replace them with the power-infused pedals.
Spider Based Power Meters
To install a spider-based power meter, you will need to remove the crankset from your bike and replace the old spider with one with power and reinstall the crankset.
What is the Best Power Meter for Your Bike?
Ready to buy a power meter?
Awesome! There are lots of different options when it comes to power meters, but before you buy, it’s super important to check the primary compatibility guidelines for your bike.
Here are a few things you’ll need to look at:
Want a little help? Click here for a step-by-step guide to make sure you get the right power meter for your bike.
How to Pick a Power Meter
Unless you are a certified cycling geek, you may not know what make, model, length and bottom bracket you are currently running on your bike. Here’s a quick guide to help you navigate this technical challenge.
The Process

Find Your Manufacturer
SHIMANO
CAMPAGNOLO
SRAM
CANNONDALE
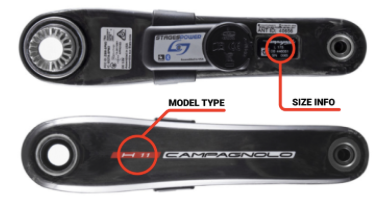
Campagnolo
Campagnolo cranks typically have the model name on the outside facing portion of the crank and all the important information you need will typically be on the inside of the left crank arm close to where the pedal spindle attaches.
We carry Campagnolo Super Record, Record, Chorus and H11. Crank lengths typically run from 165mm to 175mm with the most common being the 172.5mm
Campagnolo uses 2 main bottom bracket types, the Ultra Torque
and the Super Record Ultra-Torque systems.
Campagnolo Record and Chorus left-side power meters can be used on any Campagnolo Ultra-Torque crankset.
The Campagnolo Super Record left-side power meter is only compatible with Campagnolo Super Record Ultra-Torque cranksets.
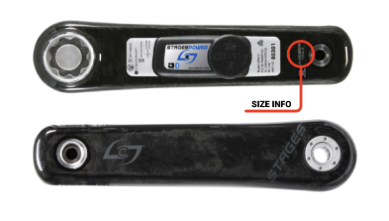
SRAM
SRAM cranks typically have the model name on the outside facing portion of the crank and all the important information you need will typically be on the inside of the left crank arm.
SRAM GXP compatibility is offered for all road cranks through the Stages Carbon for Road GXP model.
Likewise, SRAM mountain GXP cranks are compatible with the Stages Carbon for Mountain GXP models, with the exception of narrow q-factor (156mm) versions of XX and XX1 crankset.
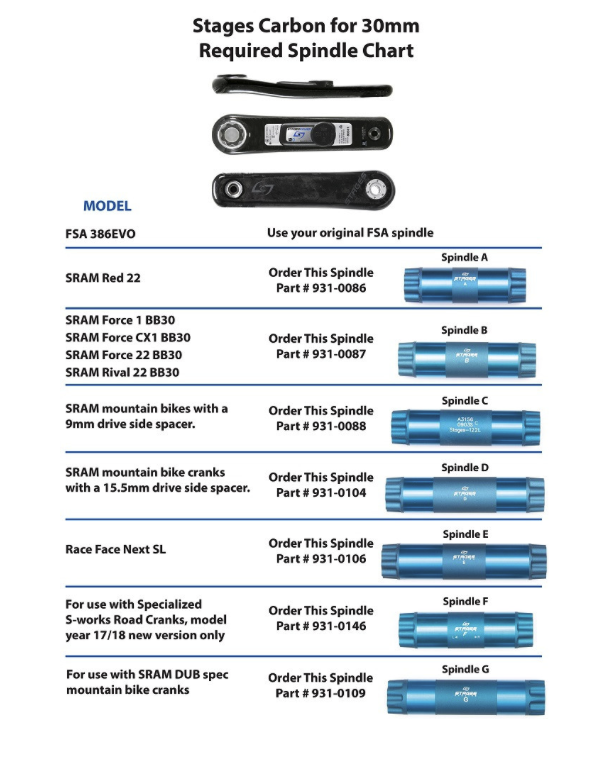
BB30 models offer a range of compatibility based on the crankset model and utilize a combination of Stages Carbon for 30mm combined with the appropriate 30mm spindle.
SRAM BB30 compatibility is limited to SRAM cranksets with the spindle attached to the left side, so older models with the spindle attached to the drive side are not compatible due to this change in design. We recommend consulting our product page for a summary of spindles available and compatible models.
FSA
FSA typically have the model name on the outside facing portion of the crank and all the important information you need will typically be on the inside of the left crank arm close to where the pedal spindle attaches.
FSA SL-K and Energy BB30 models are interchangeable with other FSA road BB30 cranks, with the exception of any triple crank models. For any 386EVO models, a Stages Carbon or Energy 386 model must be used.
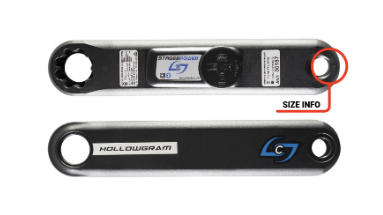
Cannondale
Cannondale typically have the model name on the outside facing portion of the crank and all the important information you need will typically be on the inside of the left crank arm close to where the pedal spindle attaches.
The Cannondale SI left crank power meter model is compatible with current generation Cannondale Si and SiSL2 cranksets.
Older Cannondale SL crank models and cranks from other manufacturers (re-branded Cannondale cranks) are not compatible due to design differences.
Race Face
Race Face typically have the model name on the outside facing portion of the crank and all the important information you need will typically be on the inside of the left crank arm close to where the pedal spindle attaches.
Currently our compatibility with Race Face is limited to Next SL cranksets which utilize a 134mm spindle, using a combination of Stages Carbon for 30mm and Spindle E.
How to Identify my Bottom Bracket Type
Bottom bracket types can be difficult to identify but don’t worry, stick with us here and we’ll be able to navigate you through the process.
If you have already identified that you have your Shimano or Campagnolo crankset then you won’t have to identify your bottom bracket connection type. You now have enough information but if you are unsure there’s more detail below.
If you have a SRAM, FSA, CANNONDALE, SPECIALIZED or RACE FACE crankset then we’ll need to find out what type of connection you’ll need to get you up and running. The bottom bracket is the bearing system that sits between your left and right crank. It’s located inside your frame in an area called the bottom bracket shell. It can come in a few different forms and normally the best way to identify that is to remove your left crank arm and that will allow you to identify your configuration
How to Identify if I Need a Spindle
Tips for Training With Power
- Test your FTP often. The more your workouts are aligned with your current fitness, the more productive they will be.
- Train in your power zones. The real value in riding with power lies in how it can inform your training. Power zones are calculated based on percentage of FTP and are commonly used for workout targets in order to give a range of intensity for an interval. Riding in each zone affects the body in unique ways and allows you to purposefully target specific exercise intensities (like active recovery, endurance, tempo, threshold, VO2 max, and anaerobic) while avoiding overtraining.
- Analyze your data to see how training and fitness are progressing. Simply having a power meter and head unit on your bike will not improve your fitness or performance. It takes time and a little study to learn how to understand and apply the information they provide, so spend a few minutes each week analyzing your data.
- Stay Consistent. “Success doesn’t come from what you do occasionally, it comes from what you do consistently.” (Marie Forleo)


